I've been trying to use the Android plugin for netbeans but it is not yet furnished to compare it to Eclipse.
My colleague taught me how to do this using the free-form project in netbeans. I would like to share it
as this will also remain as my back up of the process flow. :)
Let's consider that Java, Netbeans and android SDK are already installed on your machine.
You can either create a new project via command line, "android create project" command or use
existing projects.
If you are using existing projects use "android update project" command to update your project.
Updating your project.
1. Go to your project folder.
2. type "android update project -p ." don't forget to add the dot "." it refers to your current directory.
this will create a local.properties file and a build.xml file.
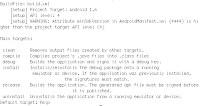
3. type "ant -p" to view the available commands that you can use on the instructions below. (photo is attached)
On Netbeans,
1. Create new Java Free-Form Project.
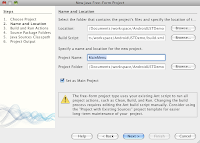
2. Browse Project.
3. The build.xml file will be on the Build Script field.
4. Name your project.
5. Click Next.
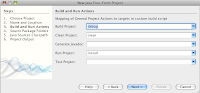
6. On the Build and Run actions specify the following based on the ant commands of the project.
Build Project: debug
Clean Project: clean
Run project: install

--------------------------------------------------------------------------
7. Click next.
8. On the Source Packages folder click next.
9. On the Java Sources Classpath, uncheck Separate Classpath....
10. Click add jar/folder
11. Search for your android.jar specified for the target you selected.
12. Click next.
13. Click Finish.
If you want to share your project change the classpath on the project.xml file
and replace the home directory of your android SDK with ${sdk.dir} which is located
on the local.properties file. Then add the local.properties file on the properties tag as a property-file.
View images below..
project.xml file:

located on this part:

-------------------------------------------------------------------


located on:
If you want to view the Android Javadocs:
Create a new Library, add the android.jar, and add the javadoc from ${ANDROID_SDK_HOME}/docs/reference.
To create a library in Netbeans:
1. Click Tools > Libraries
2. Click Create New Library
3. Name: Android
4. Classpath: locate the android.jar that you added on your project.
5. Javadoc: locate the ${ANDROID_SDK_HOME/docs/reference folder. (Note that ANDROID_SDK_HOME depends on your machine)
6. To add sources: download the source from android's open source project according to your target version.
Then add the ${SOURCE_LOCATION}frameworks/base/core/java (e.g. /Users/user/android-donut/base/core/java)
7. Click Ok.
Then you can open the javadoc window (Window > Other > Javadoc)
Voila you have a free-form Android Project.
Credits To: Edward Samson


